
Select the System | User Options menu option.

The system will display a "pop-up" window for User, System, Department, Personnel, and OT Availability Settings. Each of these sets of options are displayed on a separate "tab".
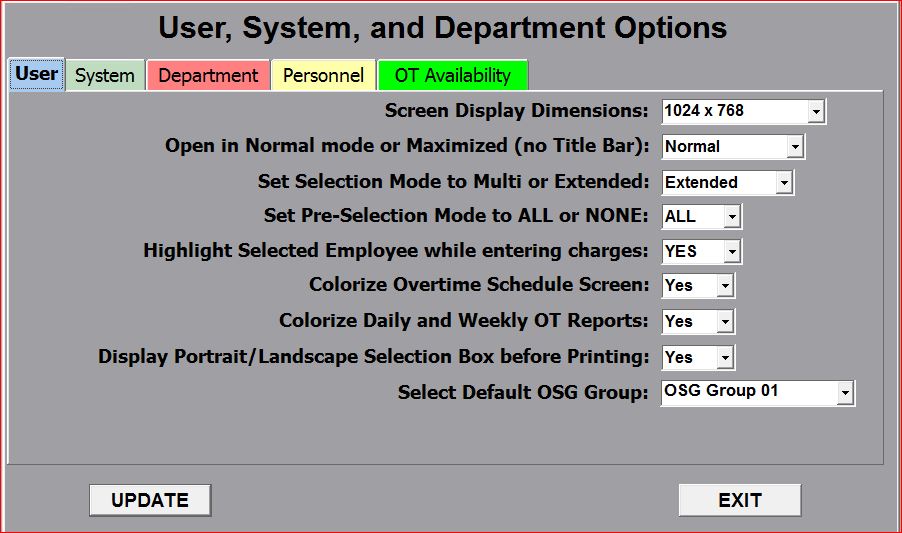
The User Settings tab includes the following:
Screen Display Dimensions - The system provides the choice of 5 different "screen dimensions" that are appropriate for the application (this is especially important if you use a "wide-screen" monitor which may distort the system screens). The system provides options of 800 x 600, 1024 x 768, 1280 x 960, 1440 x 1050, and 1600 x 1200. You should select the screen size that's most appropriate for your monitor and your personal preference.
Open in Normal mode or Maximized (no Title Bar) - This option allows you to determine how the system "opens up" each screen in the system. If you keep your Windows "task bar" (bar with the START button) visible all the time, you probably should select "Maximized", otherwise select "Normal".
Set Selection Mode to Multi or Extended - This option allows you to specify how you would like the mouse and keyboard to work when selecting multiple entries from a "list-box" in the system. The "Multi" option allows you to use the mouse only and will "toggle" the entry selected between the "selected" or "unselected" state each time you click on the mouse. The "Extended" option allows you to select as many entries as desired by using the mouse in combination with either the CTRL or SHIFT keys on your keyboard.
Set Pre-Selection Mode to ALL or NONE - This option allows you to specify how you want the system to "pre-select" entries in a "list-box". That is, you can have the system display all list boxes with either ALL items already selected (for you to "unselect" the items you don't want selected) or with NO items selected (for you to "select" the items that you do want selected).
Highlight Selected Employee while entering charges - This setting allows you to highlight the row for the employee that you are currently entering charges for on the OT Weekly Schedule. Many system users find this option to be handy since the highlight will stay on the selected employee after charges are entered that may cause that employee to move to a different screen location after their total charges have been adjusted.
Colorize Overtime Schedule Screen - This setting causes the system to add different background colors on the Overtime Weekly Schedule screen in order to differentiate between worked vs. refused vs. vacation/not eligible entries.
Colorize Daily and Weekly OT Reports - Similar to the Colorize Overtime Schedule option, this setting provides the same colorization to be applied to the OT Daily reports and the OT Weekly report.
Display Portrait/Landscape Selection Box before Printing - Due to a Windows Operating System change, this "work-around" display screen allows you to select whether you want your report to print in Portrait vs. Landscape mode.
Select Default OSG Group - Use this option to set your "default" OSG group. This value is set into each user's Registry so that it will be unique for each user.
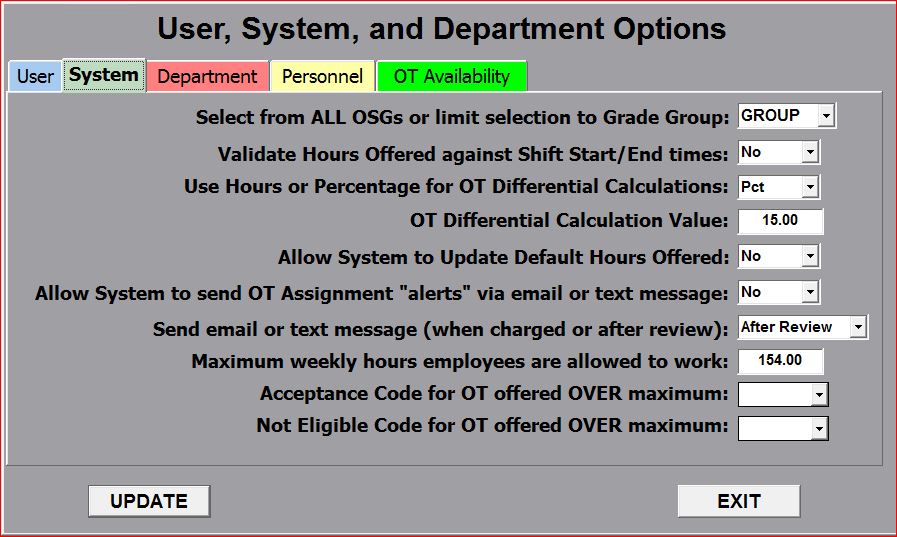
The System Settings tab includes the following:
Select ALL OSGs or limit selection to Grade Group - Not currently used (will be removed at some point in future).
Validate Hours Offered against Shift Start/End times - Use this option to have the system automatically validate that the number of hours offered is within 1 hour of the total hours calculated by subtracting the start time from the end time for that overtime assignment.
Use Hours or Percentage for OT Differential Calculations - OT Differential refers to the difference between the employee with the least amount of overtime hours charged vs. the employee with the most. These calculations can be based on a percentage value or by using a specific number of hours.
OT Differential Calculation Value - Use this option to specify either the exact number of hours or the percentage to be used in calculating the overtime differential value for each employee within an OSG.
Allow System to Update Default Hours Offered - The system maintains "default" hours offered values in the Shift Types table for each shift type and shift (i.e. MID, DAY, or EVE). These "default" values can be automatically updated by the system to facilitate easier overtime assignment processing. Set this value to YES to allow the system to update the value in the Shift Types table to the number of hours that you're offering (e.g. 4.00 hours or a half-shift) for the shift that you're working with so that the system will automatically pre-populate the Overtime Assignment screen with that value until you manually change it again, at which point the system again updates the "default" value in the Shift Types table. This option can be time-saving when you have to offer numerous employees an overtime assignment for a different number of hours than the original default in the Shift Types table. Setting this value to NO will prevent the system from making any changes to the Shift Types table. Note that this is an advanced option that may or may not be advantageous for a given company or department.
Allow System to send OT Assignment "alerts" via email or text message - This option turns on/off the capability of sending overtime assignment awards or cancellations to individual employees using email messages or text messages (or both).
Send email or text message (when charged or after review) - This option determines how email and text messages are sent. They can either be sent immediately when the employee has been "awarded" or "cancelled for" an overtime assignment OR they can be stored until the supervisor completes all overtime assignment processing and exits the Overtime Schedule Screen for a given OSG. In the latter case, a message is displayed to the user prompting them to review and send all alerts or, optionally, to skip sending alerts until later. Note that the "after review" option also allows the user to "select" which emails/texts are sent and unsent alerts are NOT saved.
Maximum weekly hours employees are allowed to work - This option displays a warning message if an overtime assignment would exceed the "union negotiated" maximum hours an employee is allowed to work in any given week. Note that the employee may still be awarded the overtime assignment if agreed to by either the employee or the union.
Acceptance Code for OT offered OVER maximum - Designated Code for any OT assignment offered, accepted, and worked over the weekly maximum.
Not Eligible Code for OT offered OVER maximum - Designated Code for any OT assignment offered, but NOT worked due to the fact that it would exceed the weekly maximum.
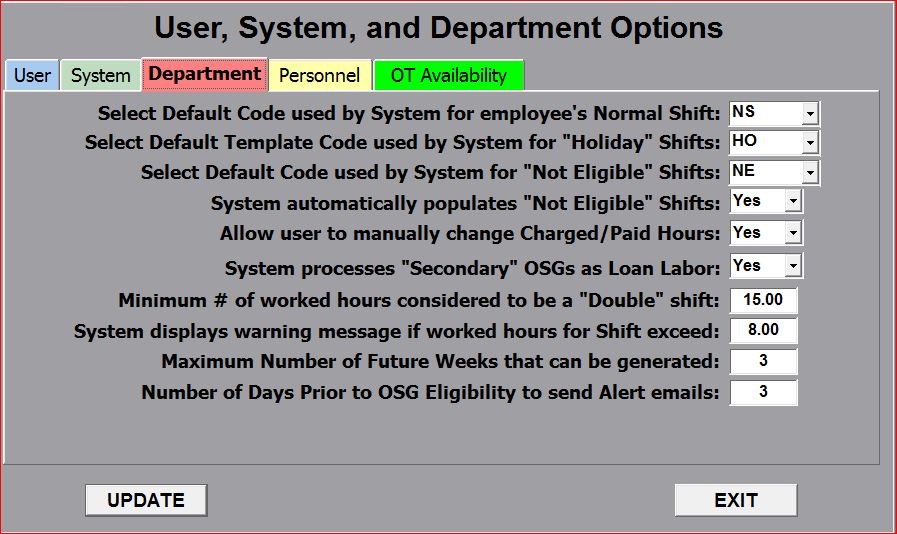
The Department Settings tab includes the following:
Enter Default Code used by System for employee's Normal Shift - This option simply allows you to select an identifier (typically "NS") that will be displayed on the Weekly Overtime Schedule to denote each employee's regularly scheduled work shifts.
Select Default Template Code used by System for "Holiday" Shifts - This value is used in the Weekly "Shift Schedule" templates to represent a holiday shift based on the Holiday Dates table. The system automatically populates all holidays shifts based on the information contained in the Holiday Dates table for each calendar year. This value is typically "HO" designating "holiday overtime".
Select Default Code used by System for "not eligible" Shifts - This value is automatically set by the system during the overtime assignment process when an employee is not eligible to work the shift being assigned. The typical entry for this value is "NE".
System automatically populates "not eligible" Shifts - This option, when set to "Yes" will set the system to automatically populate the "pop-up" window (for OT Scheduling) with the default code selected (see next option) for shifts that are NOT eligible to be offered overtime (e.g. employee has worked 16 hours straight).
Allow user to manually change Charged/Paid Hours - This option changes the display format during the overtime scheduling process. When set to "No", the Hours Charged and Hours Paid fields are "disabled" for user entry or modification. When set to "Yes", the Hours Charged and Hours Paid fields are "enabled" and can be modified by the user.
System processes "Secondary" OSGs as Loan Labor - This option ONLY works with the "Auto-Pick" functionality. When selecting overtime assignments under the "Auto-Pick" functionality, all employees in any given OSG whose Primary OSG is NOT the current OSG being processed will be considered as "loan laborers" in the OSG being processed.
Maximum # of worked hours considered to be a "Double" shift - This value is used by the system to determine the eligibility of a given employee for an overtime assignment. In other words, no employee can be considered for an additional overtime assignment if they have already worked enough contiguous hours determined to qualify as a "double-shift" based on this value.
System displays warning message if worked hours for Shift exceed - This value is always checked by the system to ensure that the hours offered/worked do not exceed this pre-determined number (typically "8.00"). The system will not prevent you from entering a higher number, but will "pop-up" a box with a warning message in case you entered the number in error.
Maximum Number of Future Weeks that can be generated - This option limits the number of future weeks (displayed in the "week-date" drop-down) that can be generated for this company or department.
Number of Days Prior to OSG Eligibility to send Alert emails - This value determines the number of days prior to an INACTIVE employee's Eligibility date that their Supervisor is sent an email alert that the employee is about to be activated for overtime assignments.
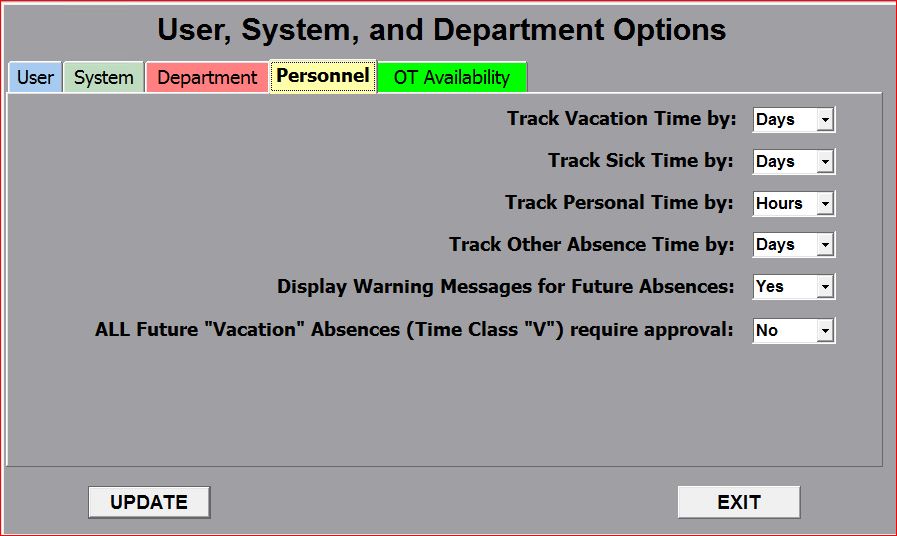
The Department-Personnel tab includes the following:
Track Vacation Time by - This option allows you to track vacation time for each employee by complete "days" or by individual "hours".
Track Sick Time by - This option allows you to track sick time for each employee by complete "days" or by individual "hours".
Track Personal Time by - This option allows you to track personal time for each employee by complete "days" or by individual "hours".
Track Other Time (e.g. Pool Days) by - This option allows you to track any other category of absence time for each employee by complete "days" or by individual "hours".
Display Warnings for Future Absences - This option determines whether or not (YES or NO) the system displays warning messages when you enter future absences that exceed the pre-set total allowable (this is set on the Employee Information screens).
ALL Future "Vacation" absences (Time Class "V") require approval - This option turns on/off the approval process for scheduling annual vacation time using the Future Absences functionality.
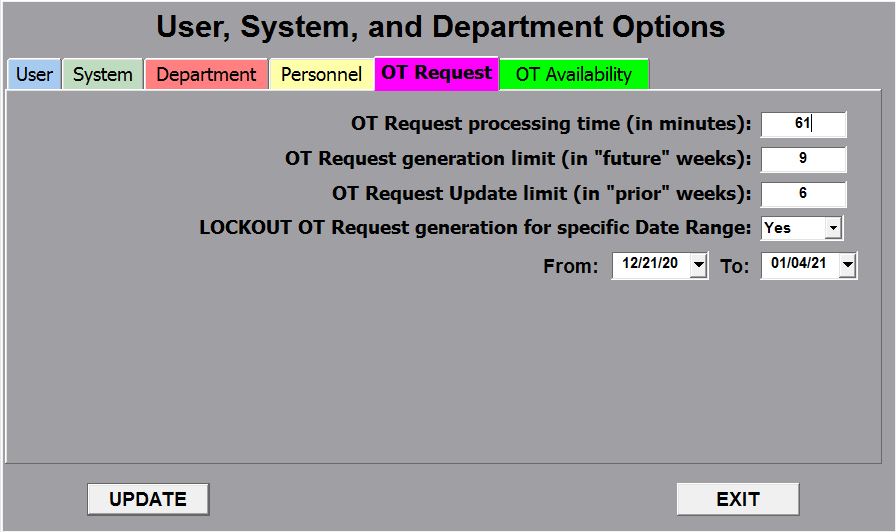
The OT Request tab includes the following:
OT Request processing time (in minutes) - This option limits the amount of time the system allows you to have an Overtime Request open without making any change to it. That is, the system will time-out of either Add or Update processing for an Overtime Request after the number of minutes specified in this field.
OT Request generation limit (in "future" weeks) - This option limits the number of weeks into the future that a Supervisor can create an Overtime Request for.
OT Request Update limit (in "prior" weeks) - This option limits the numbers of weeks in the past that an Overtime Request is available for updating purposes.
LOCKOUT OT Request generation for specific Date Range - This option allows an Administrator to prevent (or "lock out") Supervisors from creating Overtime Requests for a given date range. This means that during the date range specified, no Supervisor in your company or department has the ability to create a NEW Overtime Request. Existing Overtime Requests can still be processed during this date range. When this option is set to NO, the "From" and "To" date fields do not appear on this screen.
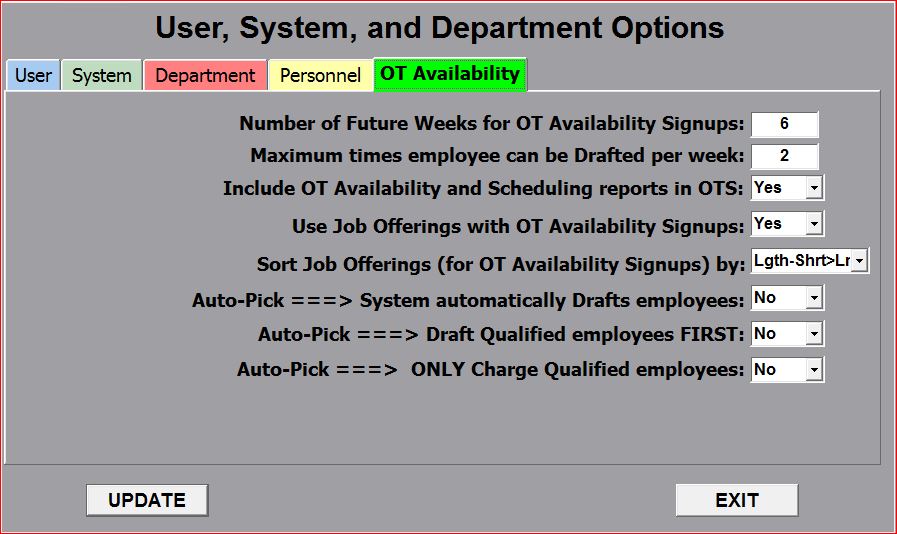
The OT Availability tab includes the following:
Number of Future Weeks for OT Availability Signups - This options allows an Administrator the ability to limit the number of weeks into the future that an employee is able to enter his or her availability for overtime. Experience has shown that some employees would sign up for overtime availability numerous months in advance without some type of restriction on this capability.
Maximum times employee can be Drafted per week - This option limits the number of times an individual employee can be drafted in any given week. Typically, this can be overridden if every available employee has been drafted the maximum number of times in a week.
Include OT Availability and Scheduling Reports in OTS - This option makes the Overtime Availability and Overtime Scheduling reports available to union employees who enter their availability using the Overtime Signup (OTS) module.
Use Job Offerings with OT Availability Signups - This option allows an Administrator to predetermine and enter the overtime assignments required for each shift during the week and to display this information to each employee who is entering their availability information using the Overtime Signup (OTS) module.
Sort Job Offerings (for OT Availability Signups) by - This option determines a sort order for companies or departments that offer multiple job offerings per shift.
Auto-Pick ===> System automatically Drafts employees - This option turns on/off automatic drafting when the number of required workers exceeds the number signed up as available. Note that the Automated Signup module MUST be turned on for any company or department using the "Auto-Pick" functionality.
Auto-Pick ===> Draft Qualified employees FIRST - This option ensures that ONLY qualified employees will be drafted using automatic drafting when the number of required workers exceeds the number signed up as available. Note that the Automated Signup module AND the Qualifications module MUST be turned on for any company or department using the "Auto-Pick" functionality with Qualifications.
Auto-Pick ===> ONLY Charge Qualified employees - This option ensures that ONLY qualified employees will be charged when using the "Auto-Pick" functionality with Qualifications.
Click on the UPDATE button to update these values in the Windows Registry or in your department's database. All of these options should take effect immediately (i.e. you do not need to logoff before these settings will become active).